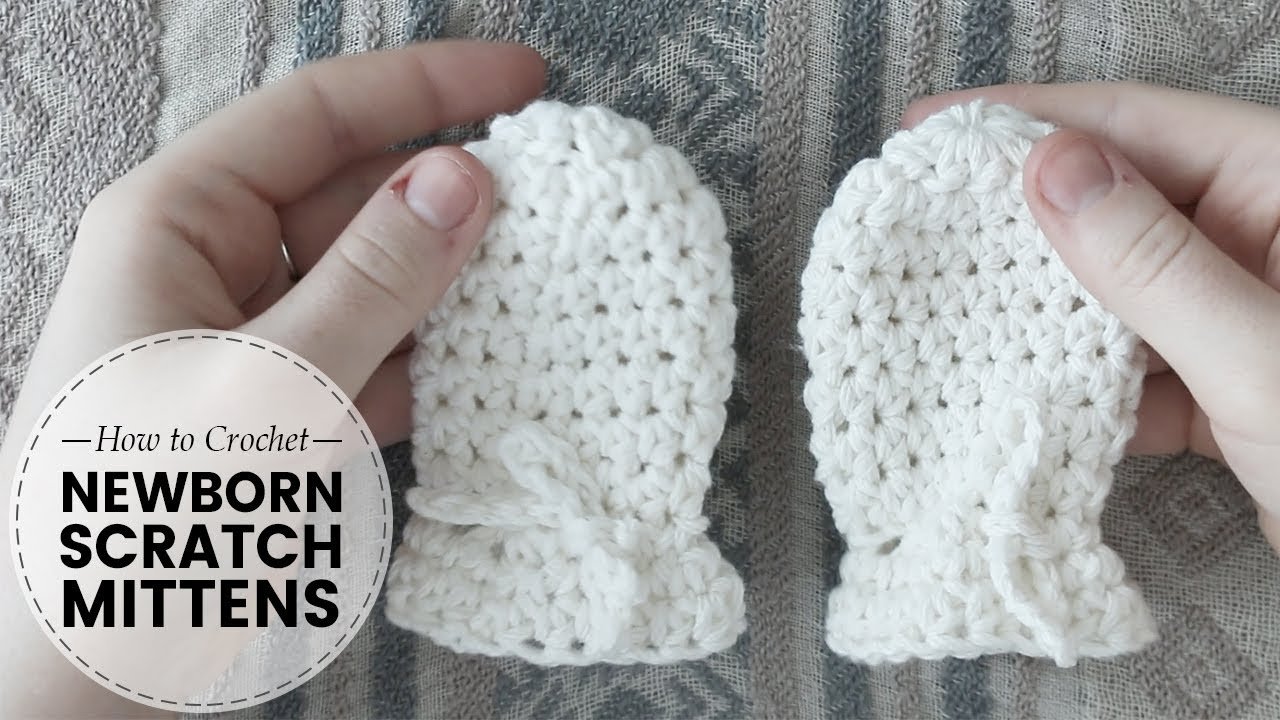
Crocheting baby mittens is a fun and rewarding project that has many practical benefits. Not only do these little accessories keep your baby’s hands warm, but they also make a cute addition to any outfit. In this article, we will explore the ins and outs of crocheting baby mittens, including why it’s such an important task for parents or caregivers to undertake.
Explanation of Crocheting Baby Mittens
Crochet is a needlework technique that involves pulling loops through other loops to create fabric. When you crochet baby mittens, you are essentially creating a small tube of fabric that fits snugly around your baby’s wrist with holes for their fingers or thumbs. This type of mitten keeps your baby’s hands warm without overheating them like gloves can sometimes do.
Importance of Keeping Babies’ Hands Warm
Babies have poor circulation in their extremities, which means their hands and feet can easily get cold. Cold hands can be uncomfortable for babies and cause them to become fussy or irritable.
Additionally, when babies’ bodies use energy to keep their extremities warm, they have less energy available for growth and development. Therefore keeping babies’ hands warm is crucial for their comfort as well as overall health.
Overview of the Benefits of Crocheting Baby Mittens
Aside from keeping your baby’s hands warm, crocheted mittens offer several other benefits. For example:
- Crochet mittens are soft and gentle on your baby’s delicate skin.
- You can customize the design and color scheme based on your preferences.
- Crochet patterns often allow you to make matching hats or booties for a coordinated look.
- You can save money by making your own mittens instead of purchasing expensive store-bought ones.
Crocheting baby mittens is a simple but important task for any parent or caregiver. It not only helps keep your baby’s hands warm but also offers many other benefits. With the right materials, techniques, and patterns, anyone can learn to crochet baby mittens and create a practical yet adorable accessory for their little one.
Materials Needed
Crocheting baby mittens requires a few basic materials that any crochet enthusiast will likely already have. For those who are new to the craft or have yet to gather all their supplies, here are the essentials needed for this particular project:
Yarn selection and quantity needed
Choosing the yarn for your baby mittens is an important decision. You want a high-quality yarn that is soft, gentle on sensitive skin, and machine washable. Acrylic and wool blends are good choices because they are easy to care for and come in a wide range of colors.
A good rule of thumb is to choose a worsted weight yarn in a light color. The quantity of yarn you’ll need depends on the size of the mittens you’re making, but it’s always helpful to err on the side of caution and get extra just in case.
For newborns, one skein (approximately 100-150 yards) should be enough. For larger sizes, such as 6-12 months or 12-18 months, you may need two skeins.
Crochet hook size and type needed
The size of your crochet hook will determine the gauge of your stitches, which can affect how well-fitted your mittens will be. For most worsted weight yarns, a size G (4 mm) or H (5 mm) hook should do the trick. However, it’s always best to check your pattern before selecting your hook.
As for type, there are several options available: aluminum hooks are lightweight while plastic hooks provide extra grip; bamboo hooks offer comfort while steel hooks allow for fine stitching detail. Ultimately it comes down to personal preference; choose what feels most comfortable in your hand!
Stitch markers, scissors, and tapestry needle
Stitch markers help keep track of the beginning of each round, making it easier to maintain a consistent stitch count. This is especially important when working in rounds, as you will be continuously joining and moving around.
A pack of locking stitch markers is highly recommended. Sharp scissors are needed for cutting the yarn after finishing each round, trimming any loose ends, and snipping off any excess yarn.
It’s important to have a pair of scissors that are sharp enough to make clean cuts but not so sharp that they damage the yarn. A tapestry needle is used for weaving in the ends of your work.
This ensures there are no loose threads or knots which could be irritating or dangerous for babies. Choose a blunt-tipped needle that won’t catch on your yarn fibers and fits easily through the small stitches made in crochet work.
Pattern Selection
Crocheting baby mittens can be both enjoyable and rewarding. To get started, you will need to choose a pattern that suits your skill level.
If you are new to crocheting, it is best to start with a simple pattern that only requires basic stitches. However, if you have some experience with crochet work, you may want to challenge yourself with more complex patterns.
When choosing a pattern, it is also important to consider the size of the mittens. Babies grow quickly, so it is essential that the mittens fit properly.
A pattern that is too small could be uncomfortable for the baby and restrict movement of their hands while a pattern that is too large could slip off easily. It is also worth mentioning that not all patterns will suit your preference.
Therefore, don’t hesitate to adapt them or even create your own if necessary. Personalizing your creations may add an extra flair of creativity and make them special for your little one or as gifts for others.
Choosing a Pattern That Suits Your Skill Level
Suppose this technique is new or unfamiliar to you; selecting an easy-to-follow guide can make all the difference in creating quality mittens successfully. In this context, novice crafters should look for patterns labeled “Easy” or “Beginner.” The instructions here usually contain fundamental stitches and brief explanations for each step involved in completing the project.
On the other hand, seasoned crocheters could opt for detailed patterns with intricate designs labeled intermediate or advanced levels in terms of difficulty level classification. The guidelines presented therein usually contain precise stitch combinations focused on achieving complex shapes using several colors and techniques.
Selecting a Pattern With The Right Sizing For Your Baby
Newborns require smaller-sized mittens than infants who are three months old or older when selecting crochet mitten guides – keep this in mind while browsing through patterns. Therefore, it is essential to ensure that the pattern you choose has accurate sizing adjustments, fit for your baby’s size and age. Some patterns come with sizing guides or charts to tailor your creation to your preference, ensuring that the mittens will fit perfectly.
Adapting Patterns To Suit Your Preferences
To adapt crochet patterns to suit personal preferences, start by considering the yarn and hook size recommended in the instructions. From here, it is possible to modify these details based on individual preferences and style.
Should you have a unique color scheme in mind or want to switch out a certain stitch pattern for another one, this is an opportune time to let creative freedom take over. By altering design elements, you can create custom-made mittens suitable for your baby’s wardrobe or as personalized gifts for family and friends.
Selecting crochet mitten patterns requires careful attention paid towards complexity level, correct sizing adjustment and personalization preferences. Take advantage of reputable online resources dedicated explicitly towards crochet crafters where a wide selection of free patterns can be found!
Crochet Techniques
Basic crochet stitches required for making mittens
Before beginning to crochet baby mittens, it’s important to have a good understanding of basic crochet stitches. The two most common stitches used in crocheting baby mittens are the single crochet (sc) and double crochet (dc). These stitches create a tight fabric that will keep babies’ hands warm.
It’s also important to know how to chain stitch (ch), which is used to begin many projects. To start, make a chain of the desired length for the cuff of your mitten.
Then, work sc or dc stitches into each chain stitch until you reach the end. To work in rounds, join with a slip stitch and continue working around in a spiral.
Tips for achieving the perfect tension in your crochet work
Tension is an important aspect of crocheting baby mittens. If your tension is too loose, the mitten will be floppy and ineffective at keeping hands warm. If it’s too tight, it may be uncomfortable for babies to wear.
The ideal tension should be firm but not stiff. One tip for achieving good tension is to pay attention to how you hold your hook and yarn.
Experiment with different positions until you find what feels comfortable and gives you good results. Another tip is to practice making swatches before starting on your mitten project so that you can get a sense of what works best for you.
Techniques for working in rounds
Crocheting baby mittens involves working in rounds rather than rows since they are circular items. When working in rounds, it’s important to use stitch markers so that you can keep track of where each round begins and ends. To start each round, make sure that you join with a slip stitch into the first stitch of the previous round; this ensures that you maintain a continuous spiral.
It’s also important to use the correct stitch count for each round so that your mitten turns out the right size. Be sure to pay attention to any increases or decreases required in a particular round, as this will affect the shape of your mitten.
Step-by-Step Instructions
Starting with the Cuff of the Mitten
Begin by creating a slipknot and attaching it to your crochet hook. Depending on your preference, you can either start with a foundation chain or make a magic ring to create the cuff. Once you have decided which method to use, chain two stitches and double crochet into each stitch of the foundation chain or magic ring.
Join with a slip stitch in the top of the first double crochet, being careful not to twist your work. This creates your first round.
For subsequent rounds, chain two stitches and double crochet into each stitch around. Use a stitch marker to mark the beginning of each round; this will help you keep track of where you are in your work.
Creating the Body of The Mitten Using Increasing and Decreasing Techniques
Continue crocheting around until you reach your desired length for the cuff portion of the mitten; this may vary depending on whether you would like a short or long mitten cuff. Once finished with creating the cuff portion comes increasing technique for body creation. To create an increase, instead of one double crochet into each stitch as before, make two double crochets into every other stitch.
This will cause an increase in stitches and make for wider mittens. When it comes time to decrease stitches for shaping purposes (such as on top area), alternate between single decreasing stitches by skipping one site then doing one single crochet or slip stitching at least twice at equal distances around (top) so that there is no extra fabric bunching up when finished.
Finishing off with A Thumb or Finger Hole
When reaching desired length (measured against baby’s hand size), pause before joining last round together and fold mitten over at centre point so that inner sides are touching and outer sides face outwards. Then slip stitch or single crochet through both inner and outer stitches of front and back pieces at the top to secure them together.
This will cause the mitten to fold over and create the opening for thumb or finger hole. Once you’ve secured the front and back pieces, you can continue crocheting around the opening with single crochet stitches as a border to make it look neater.
You can also add embellishments like buttons, ribbons, or bows to give your baby mittens a personalized touch. Remember: when finishing the last row of your mittens, make sure not to tie off too tightly so that there is enough space for baby’s hand to comfortably enter into their new pair of cozy mittens!
Tips and Tricks for Success
Troubleshooting common mistakes made when crocheting baby mittens
Even the most experienced crocheters make mistakes from time to time. When it comes to crocheting baby mittens, some common mistakes include accidental increases or decreases in the number of stitches, uneven tension, or working too tightly or too loosely. Fortunately, there are ways to fix these issues.
If you accidentally increase or decrease your stitch count, simply count your stitches regularly and pull out any extra stitches using a crochet hook. To fix uneven tension, take a break and relax your hands before continuing with your work.
Advice on how to make sure that your finished product is comfortable, safe, and durable
There are several things you can do to ensure that your handmade baby mittens are comfortable and safe for little ones. First of all, choose soft yarns that won’t irritate delicate skin. Avoid using bulky yarns that may be too warm or uncomfortable for babies’ hands.
Make sure the mittens fit well without being too tight or loose by trying them on as you go along. Additionally, consider adding slip-resistant grip elements (such as non-slip dots) to the palm side of the mitten to help prevent slips or falls.
To ensure that your finished product is durable enough for frequent use and washing cycles, consider using a washable wool blend yarn rather than pure wool (which can shrink easily). Use quality materials such as sturdy buttons instead of flimsy plastic ones that could easily come off.
Suggestions on how to personalize your finished product
One of the best things about crocheting baby mittens is their endless potential for customization! Consider adding stripes in different colors or incorporating embroidery design like little bears, rabbits etc., into the cuffs of each mitten. You could also experiment with different stitch patterns.
Consider adding a loop to the cuff so that you can hang them up to dry after washing. The possibilities are endless when it comes to customizing and personalizing your finished product!
Conclusion
Recapitulation of Key Points Covered in this Article
Throughout this article, we have discussed the importance of crocheting baby mittens to keep your little one’s hands warm. We provided an overview of the benefits of crocheting baby mittens and outlined the materials needed to make them. We also discussed how to choose a pattern and adapt it to suit your preferences, as well as the basic crochet techniques required for making mittens.
Step-by-step instructions were then provided on how to make baby mittens, including starting with the cuff and creating the body of the mitten using increasing and decreasing techniques. We offered tips and tricks for success when crocheting baby mittens, including troubleshooting common mistakes made and ensuring that your finished product is both comfortable and durable.
Encouragement to Try Out Crocheting Baby Mittens as a Fun Project
Crocheting baby mittens can be a fun project for any crochet enthusiast. Whether you are just starting out or you are an experienced crafter, making these tiny accessories is sure to be rewarding.
Not only will you get to create something beautiful with your own two hands, but you will also be providing an essential item that will keep your child warm through those chilly winter months. So why not give it a try?
You may be surprised at just how much fun it can be! With our step-by-step instructions and helpful tips along the way, you’ll be able to create beautiful baby mittens in no time at all.
A Call to Share Photos or Experiences with Other Crafters Online or In Person
We encourage all budding crochet enthusiasts out there to share their experiences with other crafters online or in person. The online crochet community is vast and welcoming, so why not join in?
Share photos of your finished mittens, ask for advice, or simply connect with others who share your passion for this wonderful hobby. Alternatively, why not start a crochet group in your local area?
Gather together with like-minded individuals and share tips, techniques, and experiences over a cup of tea. Crocheting baby mittens can be a great way to make new friends and bond over a shared love of crafting.
Crocheting baby mittens is not only a fun and rewarding hobby but also an essential way to keep your little one’s hands warm. With our step-by-step instructions and helpful tips along the way, you can create beautiful baby mittens that are both comfortable and durable.
So why not give it a try today? Share your experiences with other crafters online or in person and join the wonderful world of crochet!
😀


This is by far the best baby mitten tutorial/pattern!! I love how it turned out!
Thank you so much!
Awww thanks Kelsey & you’re most welcome =)
Love this~! I’m using your wonderful video to make a set of mittens for my friend that’s having a baby girl next year. I’ll probably check out your easy baby booties video after I finish the other mitten, too! Thank you so much for making such an easy to follow video! 🙂
Thank you for the kind words Rachel =) I hope your friend enjoys your present! Thank you for watching and for making it. 🎄Happy Holidays 🎄
Thank you so much Laura, for FINALLY offering a simple pattern for these adorable little scratch mitts….SO appappreciated by moms everywhere. It’s so nice to have someone get right to the tutorial without all that jibberish. God’s blessings..
Thanks Diana =)
Crocheted these today. Supereasy and fast too. Thanks Laura. Will start making the matching booties soon 👍👍
Have fun!
Very nice. I just finished mine on blue. Very cute 🥰🥰
Oh nice!
Those are so cute. They were easy and tutorials are easy to follow . Thanks.
Glad you like them! thank you for watching!
I am a beginner and I just followed along and made a pair of these for a much anticipated grand baby and they are adorable! Thanks for the great pattern and video!
I made a pair. Super cute!!! Thanks for sharing.
Very clear instructions! Thanks a million
Just made these with Ice Cream Yarn in Meringue to go along with a blanket I made. They came out so pretty and were very simple! Thank you
sooo beautiful 😍😍
Thank you! I have a newborn grandson and a granddaughter coming soon! Perfect timing.
Great tutorial! 😁 I have made the booties and the scratch mitts! The both turned out perfectly!! Thank you!!
Great job!
Love this tutorial. Later this year I am doing a sponsored crochet for my birthday (28 hours) and plan to make a load of these for my local baby unit, so I am using this pattern for it.
I just used this to make Winnie the Pooh inspired hunny pots for our nephew’s Halloween costume. I modified the last stitch to an alternating spike stitch to give the impression of dripping honey, and they’re adorable! Thank you!!!
That is awesome!
You are a FABULOUS teacher and you have great patterns . Thank you so very much for showing me this wonderful talent.
Thank you so much!
so love this. I will definitely be making my lil guy a pair of these tomorrow to match the blanket I made 😁💙
Wow 🤩 Thank you so much for this tutorial! I’m fairly new to crocheting but I’ve just made these for my first grandchild due in November 🥰
Fabulous…worked up quick and a lovely addition to my little baby set I’m putting together!! Thank you!!
If you’re looking for a written pattern to go along with the video, then you can find it here : https://www.etsy.com/listing/646451564/baby-scratch-mittens-downloadable Thank you 🥰